

Lesson 2: Create the Perfect Profile
Lesson 2: Create the Perfect Profile
Let's get right to action. In this lesson, we're taking at look at the 7 key items you need to check and update in your Pinterest profile for optimal results! Most of the items in this lesson can be updated by clicking the "Edit Profile" button on your Pinterest profile.
1. Profile Image
Your profile image is a small, but powerful, way to stand out and get noticed on Pinterest. If you have a "driver's license" style, face forward headshot, that's pretty unremarkable.
We want people on Pinterest to notice when they start seeing multiple, useful, informative pins that are ALL coming from you. That's going to make the person that much more likely to follow you, because they REMEMBER you!
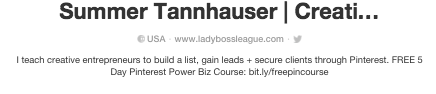
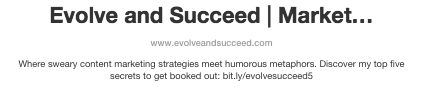
Here are some examples of strong Pinterest profile images:

Notice some similarities between them?
- They are all of a person and not a brand logo (only if you're a product-based business or a very large brand do I suggest considering a logo).
- None of them are "beauty shots" or looking right at the camera.
- The background is either white or a solid color.
- There is something of interest - a prop or hands in a pose.
These are the types of images that *stand out*. Ideally, you'll be using the same profile picture across all of your social media platforms to gain recognition!
2. Username
Your username is in your Pinterest profile's URL. The key here is to make it easy for people to find you across all social media platforms with an easy-to-remember handle.
User Name:
- Optimal length is between 3-15 characters.
- Spelled using traditional spellings (or some initials if your business name is long)
- Matches your username on Twitter, Pinterest, Periscope, etc.
3. Business Name
Your business name is KEY to your Pinterest strategy. Don't miss this one!
- Includes your name or your business/blog name (or both!). Determine how you want to be known or what potential clients will most easily recognize.
- Includes keywords. Even though the majority of your business name section will not show up on your Pinterest profile page, it WILL increase your "findability" when someone searches for those keywords.
* If you are a local-based business, consider including your location in your business name.
For example:
- Sarah Stands | Destination Wedding Planner
- Rachel Parks | Gluten Free Health Coach
- The Cheeky Chalkboard | Unique Handmade Gifts for Teachers
4. Social Profiles
You have the option of connecting your Facebook and/or Twitter account to your Pinterest page. However, you can only connect your Facebook personal profile (not your business page). So I wouldn't suggest connecting Facebook unless you have your personal profile set up for business purposes.
If you are active on Twitter, I would suggest connecting your Twitter account. Pinterest is not the most "social" of social media platforms and does not make it the easiest for Pinners to communicate with each other. Twitter gives you a way to continue the conversation.
5. Website
Double check to make sure that you have your correct website URL listed on your profile. Then it's time to confirm your website and ensure you have a business Pinterest account. This is very important step to give you access to Rich (branded) pins.
- If you're not sure whether you have a business account or not, look in the upper lefthand corner of your Pinterest page. If you see a drop down Analytics menu, then you're a business account. If not, then you need to convert to a business account.
- To convert, go to: https://business.pinterest.com/en and click the link "Already have an account? Convert now"
- Check to ensure that your website is confirmed by going to the "Edit Profile" button in the upper right hand corner of your Pinterest page. If your website is confirmed, beside your URL you'll see a check mark and "site confirmed". If it's not, there will be a button to click to confirm it.
To Confirm your Website:
- If you have SquareSpace, then Pinterest has an integration system already set up with SquareSpace. Reference this article to learn how to connect your SquareSpace page with your Pinterest account: https://support.squarespace.com/hc/en-us/articles/206543577-Using-Pinterest-with-Squarespace
- If you have WordPress, I suggest using the Pinterest plugin, which allows you to easily confirm your website without dealing with coding.
6. Rich Pins
After confirming your website, if you do not see that pins from your own website are now Rich pins (containing the blog post title and your logo directly under the pin image, and before your description), then you'll want to use the Rich Pins Validator: https://developers.pinterest.com/tools/url-debugger/
On the validator page, enter the direct URL to one of your recent blog posts, and click "Validate."
You should then receive validation that your Rich pins have been approved and are on Pinterest, if you've followed all the steps correctly to confirm your website.
7. About Section
Remember that sentence that you wrote in Lesson 1, using your what, who, and how? Time to put it into action. You have 200 characters to use in your About section. I suggest including two specific items in this section:
- Your what, who, and how "One Sentence" that gets super specific on what your business offers (from your Lesson 1 worksheet).
- A special "freebie" offer that entices people to click through to your website. If you currently have a content upgrade or "freebie" that you deliver to people who sign up for your email list, then now is the time to promote it!
* If you're a local business, consider adding your location(s) in your about section.
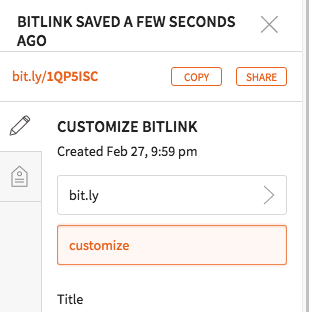
The key to doing this effectively is to use a bit.ly link. Since the link in your about section is not clickable, it's important to make the link as easy to remember as possible. Here's a few examples of this in action
If you're unfamiliar with bit.ly, it is a free service that shortens a complicated (aka long) URL into a short bit.ly link. The key is to customize your bit.ly link using a keyword that makes sense for the link that you are promoting.
If you don't have anything to offer to your readers yet through a bit.ly link, don't worry about it for now! Just use your what, who, and how sentence for your about section, and we'll be talking more about your "freebie" offering later in the course.
Take Action:
Over in the Slack team, show us a screenshot of your newly updated profile!